
Building a PC is exciting until you get to the power supply unit (PSU). Most people either overspend or worse, underspend on this critical component. I’ve seen countless builds fail because someone cheaped out on the PSU or picked the wrong wattage.
Let me walk you through everything you need to know about choosing the right power supply for your PC build.
Why Your PSU Matters More Than You Think
Your power supply is literally the heart of your PC. It converts AC power from your wall outlet into DC power that every component needs. A bad PSU can cause random crashes, component damage, or even complete system failure.
Think of it this way - you wouldn’t put cheap fuel in a sports car, right? Same principle applies to your PC build.
Understanding Wattage: How Much Power Do You Really Need
The biggest mistake most people make is either buying way too much power or not enough. Here’s how to calculate what you actually need:
Basic Power Calculation Method
Add up the power requirements of your major components:
- CPU: Check manufacturer specs (usually 65W-250W)
- GPU: This is usually the biggest power hog (150W-450W+)
- Motherboard: 50W-100W
- RAM: 3W-5W per stick
- Storage: 5W-10W per drive
- Case fans: 2W-4W each
- USB devices: 2W-5W each
Real-World Example
For a typical gaming PC with:
- Ryzen 5 5600X (65W)
- RTX 3060 (170W)
- 16GB RAM (10W)
- 2 SSDs (15W)
- Motherboard (75W)
- 3 case fans (9W)
Total: around 344W
But here’s the catch - you don’t want to run your PSU at 100% capacity. Aim for 50-70% load under normal use. So for this build, you’d want a 550W-650W PSU.
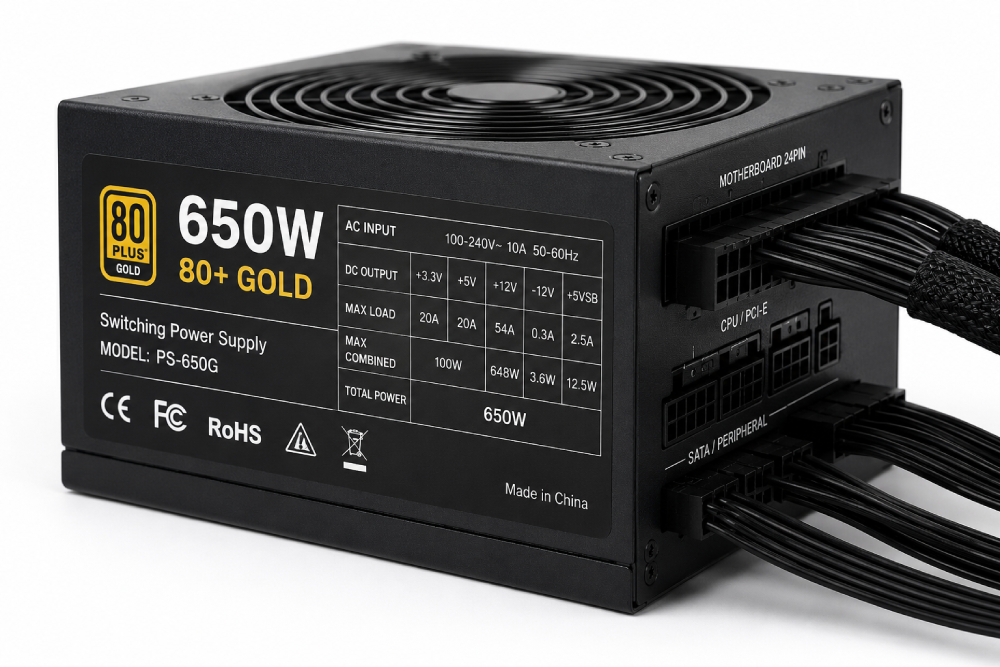
Efficiency Ratings: 80 Plus Explained
You’ve probably seen those 80 Plus ratings on PSUs. Here’s what they actually mean:
- 80 Plus: 80% efficiency at 20%, 50%, and 100% load
- 80 Plus Bronze: 82%-85% efficiency
- 80 Plus Silver: 85%-88% efficiency
- 80 Plus Gold: 87%-90% efficiency
- 80 Plus Platinum: 90%-92% efficiency
- 80 Plus Titanium: 92%-94% efficiency
For most builds, 80 Plus Bronze or Gold is the sweet spot. The price jump to Platinum or Titanium usually isn’t worth it unless you’re running your PC 24/7.
Modular vs Non-Modular: What’s the Difference
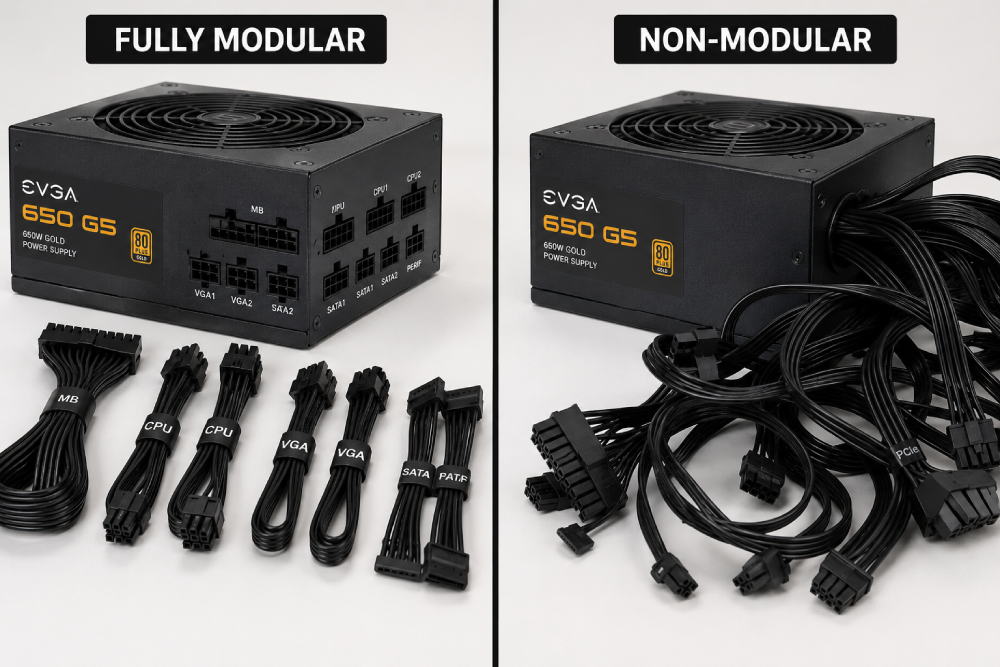
This comes down to cable management and airflow:
Non-Modular PSUs
All cables are permanently attached. They’re cheaper but can create a mess of unused cables inside your case.
Semi-Modular PSUs
Essential cables (24-pin motherboard, CPU power) are attached, but you can connect the rest as needed. Good middle ground.
Fully Modular PSUs
Every cable can be disconnected. Best for clean builds and airflow, but costs more.
For most first-time builders, semi-modular is the way to go.
Common PSU Mistakes to Avoid
I’ve seen these mistakes countless times over the years:
Buying Based on Brand Name Alone
Just because a brand makes good motherboards doesn’t mean their PSUs are good. Stick to reputable PSU brands like Seasonic, Corsair, EVGA, or be quiet!
Ignoring the 12V Rail
Modern PCs draw most of their power from the 12V rail. Make sure your PSU has strong 12V rail capacity (look for single-rail designs).
Not Checking Physical Dimensions
PSUs come in different sizes! ATX is standard, but some cases need SFX or TFX form factors. Measure before you buy.
Skimping on Protection Features
Look for PSUs with:
- Over-voltage protection (OVP)
- Under-voltage protection (UVP)
- Over-current protection (OCP)
- Short-circuit protection (SCP)
- Over-temperature protection (OTP)
How to Future-Proof Your PSU
Technology changes fast, but you can plan ahead:
- Extra Headroom: Buy 100-150W more than you currently need
- Multiple GPU Support: If you might add a second GPU, look for PSUs with multiple PCIe power connectors
- New CPU Compatibility: Modern CPUs sometimes need new power connectors
Recommended PSUs for Different Budgets
Budget Build ($50-80)
- Corsair CV series
- EVGA BR series
- Thermaltake Smart series
Mid-Range Build ($80-120)
- Corsair RM series
- EVGA GQ/GS series
- Seasonic Focus series
High-End Build ($120+)
- Corsair AX/HX series
- EVGA SuperNOVA G2/P2
- Seasonic Prime series
Installation Tips and Best Practices
Once you’ve got your PSU, here’s how to install it right:
Before Installation
- Test the PSU first (many come with paper clips for testing)
- Check your case orientation (fan facing down or up)
- Gather all your cables
During Installation
- Don’t force anything - if it doesn’t fit, check your alignment
- Route cables behind the motherboard tray when possible
- Use zip ties or Velcro straps to manage cables
- Keep cables away from fans and heat sources
After Installation
- Double-check all connections are secure
- Test the system before closing the case
- Monitor temperatures for the first few days
When to Upgrade Your PSU
You might need a new PSU if:
- You’re adding a powerful GPU
- Experiencing random crashes under load
- PSU is more than 5-7 years old
- Upgrading to multiple GPUs or high-end CPU
Final Thoughts
Your power supply isn’t the place to save money when building a PC. A good PSU will last through multiple builds and protect your expensive components. Take your time, do the math, and invest in quality.
Remember, a $100 PSU is cheap insurance for $1000+ worth of PC components. Don’t learn this lesson the hard way like so many builders do.
Your PC will thank you with stable performance and longevity. Happy building!